
When the Fall Guys game launched in summer 2020 everyone fell in love with the cute jelly bean characters. If you haven’t heard about the game, you can find out all about it on the official Fall Guys site.
I decided to try & crochet my very own fall guy, complete with sweatband, to keep us company on the couch while we play. I added a crown too, because it’s likely the only way I’ll ever get one! 🙂 If you would like to make one too, here’s my free fall guys pattern below.
Notes & Abbreviations
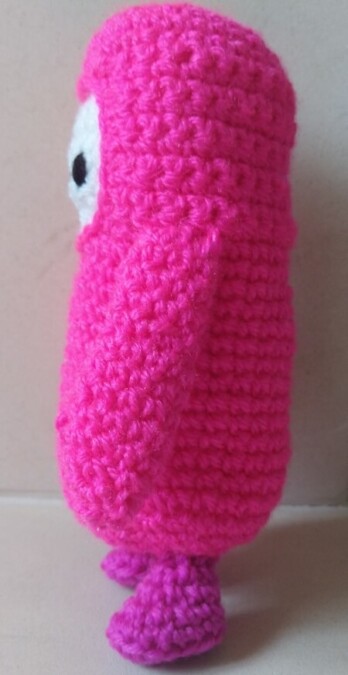
The finished fall guy amigurumi toy is 18cm high approx (20cm including crown).
Most of the pattern is crocheted in the round using the spiral amigurumi style. So each round is continuous without slip stitch joins etc.
Tip: For decreases, work into the front loops only to avoid leaving gaps.
NB this pattern uses British crochet terms. The equivalent US crochet stitches are listed after each term.
- R – round/row
- st – stitch(es)
- ch – chain
- ss – slip stitch
- dc – double crochet stitch (US: single crochet)
- dc2tog – double crochet 2 stitches together to reduce to 1 stitch (US: single crochet 2 together)
- htr – half treble crochet stitch (US: half double crochet)
- tr – treble crochet stitch (US: double crochet)
Materials
- 90m / 30g approx DK yarn
Thinner DK yarn works better. I used King Cole Dollymix DK in shade 40 Candy. - Small amounts of white & black DK yarn for the face
- 3.5mm crochet hook
- Sewing needle for stitching eyes & assembly.
- Toy stuffing for filling your fall guy.
Optional
- Small amount of yellow/gold DK yarn to make a crown
- Fabric stiffener for crown if desired
I used Dylon spray starch - Small amount of coloured yarn to make head sweatband
- Pins to aid with positioning prior to sewing etc
Head
Using the magic circle technique do 6 dc and join with ss. [6 st]
R1: 2 dc in each st. [12 st]
R2: (2 dc in 1st st, 1 dc in next) & repeat for rest of round. [18 st]
R3: (2 dc in 1st st, 1 dc in next 2 st) & repeat for rest of round. [24 st]
R4: (2dc in 1st st, 1 dc in next 3 st) & repeat for rest of round. [30 st]
R5-6: work 2 rounds even.
Now switch to working in rows to make the hole for the face using a gap of 8 stitches.
R7: dc 10 ch 1 turn
R8-15: dc 22 ch 1 turn for 8 rows (omit ch 1 turn on last, stay on right side)
R16: ch 8 across to the other side, dc 11.
Mark end of round at centre back & resume working in rounds.
R17-18: work 2 rounds even. [30 st]
Before continuing on with the body, we will make & insert the face. So leave a long loop out of your main piece or add a knot so you don’t lose your progress.
The square opening for the face may look too big and square now, but that’s OK.
Using the far end of your yarn ball, put your hook into a stitch around the middle of the bottom edge of the square. Slip stitch around the opening (bottom left, left, top, right & back to the starting point). Skip stitches at each corner to round them so the opening looks less square. I ended up with 25 slip stitches, but the exact number doesn’t matter. Your opening does not need to look like a perfect circle either. It will stretch into a nice round shape once stuffed later on.
Here is a picture of how it should look with the slip stitching done – still a bit rough now but it will work out fine!

Face
With white yarn, ch 11.
R1: Skip 1st chain, dc 10, ch1 turn
Do 10 rows of dc & cast off.
Eyes
Thread a needle with black yarn and make a few vertical stitches about 2 dc long for each eye.
I placed these on row 4 & 5 up from the bottom 2-3 st in from each side leaving 3 st between the eyes.
So now you should have your white square with embroidered eyes looking similar to the picture below:

Assemble Head
Now place your square face piece under the hole in the head until you are happy with the position & pin if desired.
Turn the head piece inside out. With a needle & a length of main colour yarn, attach the white face piece to the head at a few points only.
Here’s a picture of mine to illustrate. You can see just a few pink tacking stitches dotted around:

Do not fully stitch the two pieces together so that you have flexibility to adjust the face hole to a nice round shape once stuffed.
Turn your head back right side out and smile at your cute little Fall Guy. 🙂
Next continue on with the rest of the body.
Body
R19: dc 8, 2 dc in next st, dc 12, 2 dc in next st, dc 8. [32 st]
R20-21: work 2 rounds even.
R22: dc 9, 2 dc in next st, dc 12, 2 dc in next st, dc 9. [34 st]
Now stuff the head and body. Don’t overstuff to avoid your fall guy looking too lumpy or stiff. Add stuffing bit by bit, shaping & checking as you go. If you use Hi-loft polyester toy stuffing, small amounts should fill out nicely to give a nice soft jellybean shape. You can also fine tune the face hole at this stage into a nice round shape. It doesn’t need to be a perfect circle.
Add a bit more stuffing for the bottom of the body as you complete the decrease rounds below:
R31: (dc 3, dc2tog) & repeat for rest of round ending with 4 dc. [28 st]
R32: (dc 2, dc2tog) & repeat for rest of round. [21 st]
R33: (dc 2, dc2tog) & repeat for rest of round ending with 1 dc. [16 st]
R34: (dc 2, dc2tog) & repeat for rest of round. [12 st]
Cut yarn and pull through stitches to close hole at bottom of body.
Arms
Top of arm: Ch 8 & join with ss to work in the round. [8 st]
R1-5: dc in each st.
R6: (2 dc in 1st st, dc in next 3 st) & repeat. [10 st]
R7-10: work 4 rounds even.
R11: (dc2tog, dc in next 3 st) & repeat. [8 st]
R12: (dc2tog, dc in next 2 st) & repeat. [6 st]
Fasten off & lightly stuff arm with very little at top & more as progress down arm.
Stitch through remaining 6 stitches and pull to close hole at bottom of hand.
Repeat for 2nd arm and shape lightly for left and right curved shape.
Then position on main piece, with top of arm roughly level with bottom of face hole.
Once happy sew stitches around top of each arm to body.
Thumbs (optional)
Fall guy bean characters have 3 fingers, but I just added thumbs given the small size of the figure. Even they are a bit fiddly so just skip them if you like!
To make each thumb:
Ch 4.
R1: skip 1st st, dc in 3 st, ch 1 turn
R2: dc in 2 st, ss in last st.
Fasten off & stitch the top & bottom seams together working from the narrow end and leaving last bit open unstitched.
Position at outward angle on arm approx 5 rows from the bottom, attaching open fatter end on arm and sew in place.

Feet
The little shoe feet are a bit more involved so I’ll explain the approach first.
- First create the foot sole by working in both sides of the chains.
- Next do a round working into the back loops only to create the sole edge.
- Then use decreases mid round to work the front of the shoe.
I have a step by step picture tutorial for this shaped foot technique here. Note that it relates to a different pattern, so the stitch counts will differ, but the method is the same & explained in detail.
Foot instructions:
Ch 5.
R1: skip 1st st, dc in next 3, 3 dc in final chain.
Now instead of turning to start a new row, continue around working into bottom loops of initial chains. Do 1 dc in the next 3 st & 2 dc in the next st. [11 st]
R2: 2 dc in 1st st, dc in next 2 st, 2 dc in next 3 st, dc in next 5 st. [15 st]
R3: do a round of dc working only into the back loops. This creates the outer edge of the foot sole.
R4: dc in 3 st, dc2tog 4 times, dc in next 4 st. [11 st]
R5: dc in 2 st, dc2tog 3 times, dc in next 3 st. [8 st]
R6: dc in 2 st, dc2tog 2 times, dc in next 2 st. Ss to next stitch & fasten off. [6 st]
Repeat for other foot & stuff both feet lightly to match.
Position under body, with the inner side of each foot beside the first spiral ring approx. Then stitch around the top of each foot to attach to the body.

Ta-da! Your very own super cute fall guy is now complete.

Accessories
If your jelly bean feels a bit naked, why not style him up with some accessories. Here are a couple of quick ideas to get you started:
Crown
With yellow/gold yarn, ch 24 & ss to make a circle.
R1-3: ch 1, dc in each st, ss to 1st st at end of round.
R4: ch 3, skip 1st ch, htr in 2nd chain, tr in 3rd chain. Skip 2 st & ss in next st. Repeat for rest of round & fasten off.
Technically there is a gap between each crown triangle point & the base but you don’t see it. You can stitch these closed on the inside if you prefer.
If your crown is a bit floppy or out of shape, you can use fabric stiffener on it. I gave mine a spray of Dylon spray starch and left it to dry for a bit.
Head sweatband
With white yarn, ch 32 & ss to make a circle.
R1: ch 1, dc in each st & ss to 1st st at end of round.
R2-3: switch colour & repeat R1.
R4: switch back to white & repeat R1 and fasten off.

I hope you enjoy making this free Fall Guys pattern. This is my first ever crochet pattern, so if you have any questions just comment below & I will try my best to help.
If you found this pattern useful, I’d really appreciate it if you could share this post on social media. Thanks! 🙂
This is an unofficial fan pattern for personal, non-commercial use only. It may not be copied, sold or distributed in any way, nor any finished items made using it sold, without permission.
Be sure to check out my other video game crochet patterns too.

It’s amazing, I’ll give it a go. My Little Boy has just begged me to after seeing this 🙂
Thanks Anne 🙂 It starts to take shape quite quickly & any yarn oddments will do. Any questions just shout. Has your little boy played the game yet or does he just like the look of the toy?
He plays, I’m almost finished 🙂
Quick work! I’m sure he is a better player than me 🙂
I made one!
https://uploads.disquscdn.com/images/c0829f7b5548f1222443a1f85c1f3d1dec646a9b22a40a486aee3c22af3fe7d3.jpg
Fab! Thanks so much for sharing a pic of your little fall guy 🙂
Hi again – I may be doing a follow up gallery blog post to show off everyone’s fall guy creations! 🙂 Would you mind if I included your pic in this? I can of course credit you by name/link if you like? Thanks
hello,what is the measure of the fall guy??
The fall guy is 18cm high approx (20cm inc crown). Depending on the yarn used and tension etc, your figure may differ slightly.
thank you so much
Rows 8 to 15 ?is there a gap when you continue to do 22 DC? Can I see a picture of row 7 to 8
Hi Gloria,
For the 1st 6 rounds, you have been working in rounds & you have 30 stitches. You then switch to working back and forth in rows instead. You will crochet the back and sides of the head like this. Then you will resume working in full 30 stitch rounds again from round 17. By this time you will have a squarish hole for the face.
So you have your curved bowl shape for the top of the head after round 6. Now stop working in rounds.
On row 7, you just do 10 dc and stop. Ch 1 and turn your work.
On row 8, do 22 dc, ch 1 and turn again.
Then row 9-15 just repeat this 22 dc row.
So instead of just continuing to make a solid sausage shape in the round, your sausage will have a big gap in it, which is for the fall guy face hole.
On row 16 you ch 8 across to meet the other side, dc 11 and then resume working in full rounds from there.
Does this make sense? If not, let me know & I will try and make another one when I have time & take pics as I go along.
Omg just figured it out read pattern wrong now on a roll, going to make for grandsons ty
That’s great Gloria. I’d love to see a pic of your fall guys when you are done 🙂